Snag My Blinkie

Find me on FB
Blogs I Love


Proud Member


Blog Awards


Wednesday, July 31, 2013

~~Click on Sample to view
full size~~
This Tutorial was written on July 31st 2013 by Ashly
It is of my own creation and any resemblance to any other tutorial is purely coincidental.
Please do not copy and do not post elsewhere.
This Tutorial was written on July 31st 2013 by Ashly
It is of my own creation and any resemblance to any other tutorial is purely coincidental.
Please do not copy and do not post elsewhere.
Do not translate or
script.
This tutorial is written as if you have a general knowledge on how to use the program.
This tutorial is written as if you have a general knowledge on how to use the program.
***What you'll need***
Program of Choice.
I am using Photoshop CS5
But, if you know your
tools you can use any program of choice
Tube of choice.
I am using the artwork of PinUp Toons
You must purchase a
license to use his tubes and can do so HERE
This was a bonus tube but,
there are plenty of others that would work so well with this
Scrapkit of Choice
I am using Inpired by kit
by Chichi Designs
You can find this kit HERE
It was inspired by the
tube I'm using in this tutorial
Mask of Choice
I am using Mask219 by
Weescotslass Creations
You can find this for
download HERE
Additional Filters
PhotoEffex - Scanlines
Xenofex 2 - Constellation
~*~*~ Let's Get
Started~*~*~
Start a new canvas
600px by 600px
Flood fill with white.
Open frame1
Add to your canvas
Resize down by 80%
Add a drop shadow
Open frame3
Add to your canvas
Resize down by 80%
Add a drop shadow
Open Paper3
Resize to 600px by 600px
Add to your canvas
Use your magic wand to
select inside the circle frame
Select → Modify →
Expand, by 5
Invert the selection
On the paper layer press
delete
Duplicate this layer
Filter → PhotoEffex →
Scanlines
Width set to 3
change the blend mode to
soft light
Open FlowerBrush2
Add to your canvas below
the frame
Resize a bit
Erase any that's outside
the frame
Open Paper2
Resize to 600px by 600px
Add to your canvas just
above the white background layer
Apply the layer mask here
Open your tube
Add your tube to your
canvas, resize and reposition to your liking
Duplicate
Filter → Blur →
Gaussian Blur
Change the blend mode to
screen
lower the opacity to 50%
To the bottom tube add a
drop shadow
Add your tube in between
the two paper layers
Resize and position as
you'd like
I flipped mine
horizontally
Erase any that's outside
the frame
Change the blend mode to
luminosity
Lower the opacity of them
to 50%
Now add which elements
you'd like
I used the following from
the bottom layer up with a drop shadow unless stated:
PearlsSparkle
SparkleTrail (no drop
shadow)
Branch
Branch
Grass (no drop shadow)
Feather (no drop shadow)
Feather (no drop shadow)
PearlsSparkle (just one
pearl)
PearlsSparkle (just one
pearl)
PearlsSparkle (just one
pearl)
Rainbow
DandilionSeeds
Grass2
Flowers
Flower2
Flower2
Flower
Add some wordart (there
are some in the kit, I just used the same wording and made it my own
a bit :) )
Add your name
Crop your tag to get rid
of the access space that's not needed
Resize if you'd like to
****Most Important****
Add your copy right
information
If you're happy with your
result save to your liking and you're done!
Now to animate if you'd
like to!
Duplicate the FlowerBrush2
layer 3 times
So there are a total of 4
layers
On the first layer
Filter → Xenofex 2 →
Constellation
With the following
settings:
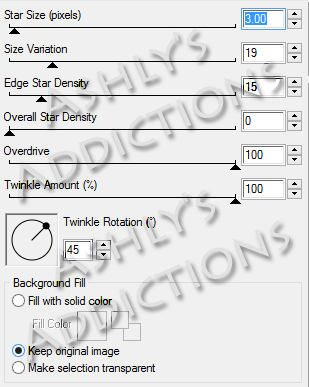
Repeat these for the other
three layers
Hitting random seed once
for each
Go to your animation
window
Hide all but the first
FlowerBrush2 layer
Set to repeat forever
Delay of .15 seconds
Add a new layer
Hide the first layer
Unhide the second
Add a new layer
Hide the second
Unhide the third
Add a new layer
Hide the third
Unhide the fourth
Press play, watch it go!
If you're happy with your
results save as a .gif and you're done!
Here is an example of it non-animated
Click to bring it to full size

Subscribe to:
Post Comments
(Atom)
I CT For

0 comments:
Post a Comment