Snag My Blinkie

Find me on FB

Blogs I Love


Proud Member


Blog Awards


Showing posts with label ChiChi Designs. Show all posts
Showing posts with label ChiChi Designs. Show all posts
Sunday, October 12, 2014

~~Click
on Sample to view full size~~
This Tutorial was written on October 12th, 2014 by Ashly
It is of my own creation and any resemblance to any other tutorial is purely coincidental.
Please do not copy and do not post elsewhere.
This Tutorial was written on October 12th, 2014 by Ashly
It is of my own creation and any resemblance to any other tutorial is purely coincidental.
Please do not copy and do not post elsewhere.
Do
not translate or script.
This tutorial is written as if you have a general knowledge on how to use the program.
This tutorial is written as if you have a general knowledge on how to use the program.
***What you'll need***
Program of Choice.
I am using Photoshop CS5
But,
if you know your tools you can use any program of choice
Tube of choice.
I am using the artwork of Ismael Rac
You
must purchase a license to use his tubes and can do so HERE
Scrapkit
of Choice
I
am using the scrapkit “Boolloween” by Chichi Designz
You
can find this HERE
Mask
of Choice
I
am using Mask254 by Weescotslass Creations
You
can find this for download HERE
Texture
of Choice
I
am using a scanlines pattern
~*~*~
Let's Get Started~*~*~
Start
a new canvas
600px
by 600px
Flood
fill with white.
Open
Frame1
Add
to your canvas
Resize
down by 60%
Add
a drop shadow
Open
Paper10
Resize
to 600px by 600px
Add
to your canvas
Resize
down by 65%
Use
your magic wand to select inside the frame
Select
→ Modify → Expand, by 8
Invert
the selection
On
the paper layer press delete
Duplicate
this layer
Add
your texture into this selection as well
I
change my blend mode to soft light and lowered the opacity to 50%
Open
Paper7
Resize
to 600px by 600px
Add
to your canvas just above the white background layer
Apply
the layer mask here
Add
your tube to your canvas, resize and reposition to your liking
Duplicate
On
the botttom one
Add
a drop shadow
On
the top one
Filter
→ Blur → Gaussian Blur, 3.0px
Change
the blend mode to soft light.
Lower
the opacity to 70%
In
between the paper frame background layers
add
your tube again, how you're wanting to
Erase
any that is outside the frame
Change
the blend mode to luminosity and lower the opacity to 30%
Now
add which elements you'd like
I
used the following from the bottom layer up with a drop shadow unless
stated:
Brush
(no drop shadow)
Tree1
Moon
Words
(no drop shadow, blend mode to overlay)
Web
GhostClock
Lantern
LeaveBranch
LeaveBranch
RazorBlade
Ribbon
Hat
Tombstone1
Crow
Tombstone
Pumpkin2
Leaves
Leaves
BowPuppet
BowTag
Spider
Bats
(Just 1 of them, added an outer glow as well)
Bats
(Just one, same outer glow as to other)
Add
your name
Crop
your tag to get rid of the access space that's not needed
Resize
if you'd like to
****Most
Important****
Add
your copy right information
If
you're happy with your result save to your liking and you're done!
Tuesday, November 12, 2013

~~Click on Sample to view full
size~~
This Tutorial was written on November 11th 2013 by Ashly
It is of my own creation and any resemblance to any other tutorial is purely coincidental.
Please do not copy and do not post elsewhere.
This Tutorial was written on November 11th 2013 by Ashly
It is of my own creation and any resemblance to any other tutorial is purely coincidental.
Please do not copy and do not post elsewhere.
Do not translate or script.
This tutorial is written as if you have a general knowledge on how to use the program.
This tutorial is written as if you have a general knowledge on how to use the program.
***What you'll need***
Program of Choice.
I am using Photoshop CS5
But, if you know your tools you can
use any program of choice
Tube of choice.
I am using the artwork of VeryMany
You must purchase a license to use
their tubes and can do so HERE
Scrapkit of Choice
I am using the scrapkit “Dreams”
by Chichi Designz
You can find this HERE
Mask of Choice
I am using BigMask001 by Vix
You can find this for download HERE
Additional Filters Needed
Penta – Jeans
Xero-Porcelain
~*~*~ Let's Get Started~*~*~
Start a new canvas
600px by 600px
Flood fill with white.
Open Frame7
Add to your canvas
Resize down by 75%
Add a drop shadow
Open Paper2
Resize to 600px by 600px
Add to your canvas
Use your magic wand to select
inside the frame
Select → Modify → Expand, by 5
Invert the selection
On the paper layer press delete
Duplicate this layer
Filter → Penta → Jeans
All at default
Change the blend mode to soft light
Open Paper15
Resize to 600px by 600px
Add to your canvas just above the
white background layer
Apply the layer mask here
Add your tube to your canvas,
resize and reposition to your liking
Duplicate
On the botttom one
Filter → Xero → Porcelain
All at default except for slide the
blue to 0
Fitler → Sharpen → Sharpen
Edges
Add a drop shadow
On the top one
Filter → Blur → Gaussian Blur,
3.0px
Change the blend mode to screen
Lower the opacity to 70%
In between the paper frame
background layers
add your tube a coupe more times
how you're wanting to
Merge them together
Erase any that is outside the frame
Change the blend mode to luminosity
and lower the opacity to 50%
Above the tubes layer add “Words”
Change the blend mode to overlay
Erase any that's outside the frame
Now add which elements you'd like
I used the following from the
bottom layer up with a drop shadow unless stated:
Brush2 (no drop shadow)
Glitter (no drop shadow)
Glitter (no drop shadow)
Brush (no drop shadow)
Bubbles1 (no drop shadow)
Bubbles1 (no drop shadow)
Branch
Tree (no drop shadow)
Tree (no drop shadow)
Clock
Ribbon
Jar
Rainbow (no drop shadow)
Fan
Keystring
Letter
CrystalFlower
Cupcake
CrystalFlower
Ring
Flower6
Flowerbroche
Violin
Butterflies (just 1)
Butterflies (just 1)
Sparkles3 (no drop shadow)
Sparkles2 (no drop shadow)
Add your name
Crop your tag to get rid of the
access space that's not needed
Resize if you'd like to
****Most Important****
Add your copy right information
If you're happy with your result
save to your liking and you're done!
Friday, August 9, 2013

~~Click on Sample to view
full size~~
This Tutorial was written on August 9th 2013 by Ashly
It is of my own creation and any resemblance to any other tutorial is purely coincidental.
Please do not copy and do not post elsewhere.
This Tutorial was written on August 9th 2013 by Ashly
It is of my own creation and any resemblance to any other tutorial is purely coincidental.
Please do not copy and do not post elsewhere.
Do not translate or
script.
This tutorial is written as if you have a general knowledge on how to use the program.
This tutorial is written as if you have a general knowledge on how to use the program.
***What you'll need***
Program of Choice.
I am using Photoshop CS5
But, if you know your
tools you can use any program of choice
Tube of choice.
I am using the artwork of Elizabeth Austin
You must purchase a
license to use her tubes and can do so HERE
Scrapkit of Choice
I am using the scrapkit
“Elizabeth Austin 14-2” by Chichi Designz
You can find this HERE
This is the kit inspired
by the tube I'm using
Mask of Choice
I am using BigMask001 by
Vix
You can find this for
download HERE
~*~*~ Let's Get
Started~*~*~
Start a new canvas
600px by 600px
Flood fill with white.
Open Frame4
Add to your canvas
Resize just the height
down by 65%
Add a drop shadow
Duplicate
Rotate the bottom one 15
degrees
Open paper1
Resize to 600px by 600px
Add to your canvas
Use your magic wand to
select inside the frames
Select → Modify →
Expand, by 5
Invert the selection
On the paper layer press
delete
Open paper6
Resize to 600px by 600px
Add to your canvas just
above the white background layer
Apply the layer mask here
Add your tube to your
canvas, resize and reposition to your liking
Duplicate
Filter → Blur →
Gaussian Blur, 3.0px
Change the blend mode to
screen
Lower the opacity to 50%
To the bottom tube add a
drop shadow
Now add which elements
you'd like
I used the following from
the bottom layer up with a drop shadow unless stated:
Grass
Swirl2 (no drop shadow)
Doodle (no drop shadow)
Doodle (no drop shadow)
LaceBrush2 (no drop
shadow)
LaceBrush2 (no drop
shadow)
Flower1
Flowers1
FlowerFrame
Flowers2
Clouds (no drop shadow)
Flower1
Flowers1
Bird
Butterfly
Sparkle (no drop shadow)
Butterfly
Butterfly
Sparkle (no drop shadow)
Add your name
Crop your tag to get rid
of the access space that's not needed
Resize if you'd like to
****Most Important****
Add your copy right
information
If you're happy with your
result save to your liking and you're done!

~~Click on Sample to view
full size~~
This Tutorial was written on August 8th 2013 by Ashly
It is of my own creation and any resemblance to any other tutorial is purely coincidental.
Please do not copy and do not post elsewhere.
This Tutorial was written on August 8th 2013 by Ashly
It is of my own creation and any resemblance to any other tutorial is purely coincidental.
Please do not copy and do not post elsewhere.
Do not translate or
script.
This tutorial is written as if you have a general knowledge on how to use the program.
This tutorial is written as if you have a general knowledge on how to use the program.
***What you'll need***
Program of Choice.
I am using Photoshop CS5
But, if you know your
tools you can use any program of choice
Tube of choice.
I am using the artwork of Amy Matthews
You must purchase a
license to use her tubes and can do so HERE
Scrapkit of Choice
I am using the scrapkit
“Ted Hammond 27-3” by Chichi Designz
You can find this HERE
Mask of Choice
I am using Mask219 by
Weescotslass Creations
You can find this for
download HERE
~*~*~ Let's Get
Started~*~*~
Start a new canvas
600px by 600px
Flood fill with white.
Open Frame1
Add to your canvas
Rotate -15 degrees
Resize just the height
down by 45%
Add a drop shadow
Open Paper1
Resize to 600px by 600px
Add to your canvas
Use your magic wand to
select inside the frame
Select → Modify →
Expand, by 5
Invert the selection
On the paper layer press
delete
Open Paper6
Resize to 600px by 600px
Add to your canvas just
above the white background layer
Apply the layer mask here
Add your tube to your
canvas, resize and reposition to your liking
Duplicate
Filter → Sharpen →
Sharpen
Lower the opacity to 50%
To the bottom tube add a
drop shadow
Now add which elements
you'd like
I used the following from
the bottom layer up with a drop shadow unless stated:
Moon (added an outer glow)
Cloud (no drop shadow)
Cloud (no drop shadow)
Smudges (no drop shadow)
Rubble (no drop shadow)
Web
Vines
Cross
Branch
Broom
Cauldron
Bottle
Skulls
Rose
Spider
Add your name
Crop your tag to get rid
of the access space that's not needed
Resize if you'd like to
****Most Important****
Add your copy right
information
If you're happy with your
result save to your liking and you're done!
Wednesday, July 31, 2013

~~Click on Sample to view
full size~~
This Tutorial was written on July 31st 2013 by Ashly
It is of my own creation and any resemblance to any other tutorial is purely coincidental.
Please do not copy and do not post elsewhere.
This Tutorial was written on July 31st 2013 by Ashly
It is of my own creation and any resemblance to any other tutorial is purely coincidental.
Please do not copy and do not post elsewhere.
Do not translate or
script.
This tutorial is written as if you have a general knowledge on how to use the program.
This tutorial is written as if you have a general knowledge on how to use the program.
***What you'll need***
Program of Choice.
I am using Photoshop CS5
But, if you know your
tools you can use any program of choice
Tube of choice.
I am using the artwork of PinUp Toons
You must purchase a
license to use his tubes and can do so HERE
This was a bonus tube but,
there are plenty of others that would work so well with this
Scrapkit of Choice
I am using Inpired by kit
by Chichi Designs
You can find this kit HERE
It was inspired by the
tube I'm using in this tutorial
Mask of Choice
I am using Mask219 by
Weescotslass Creations
You can find this for
download HERE
Additional Filters
PhotoEffex - Scanlines
Xenofex 2 - Constellation
~*~*~ Let's Get
Started~*~*~
Start a new canvas
600px by 600px
Flood fill with white.
Open frame1
Add to your canvas
Resize down by 80%
Add a drop shadow
Open frame3
Add to your canvas
Resize down by 80%
Add a drop shadow
Open Paper3
Resize to 600px by 600px
Add to your canvas
Use your magic wand to
select inside the circle frame
Select → Modify →
Expand, by 5
Invert the selection
On the paper layer press
delete
Duplicate this layer
Filter → PhotoEffex →
Scanlines
Width set to 3
change the blend mode to
soft light
Open FlowerBrush2
Add to your canvas below
the frame
Resize a bit
Erase any that's outside
the frame
Open Paper2
Resize to 600px by 600px
Add to your canvas just
above the white background layer
Apply the layer mask here
Open your tube
Add your tube to your
canvas, resize and reposition to your liking
Duplicate
Filter → Blur →
Gaussian Blur
Change the blend mode to
screen
lower the opacity to 50%
To the bottom tube add a
drop shadow
Add your tube in between
the two paper layers
Resize and position as
you'd like
I flipped mine
horizontally
Erase any that's outside
the frame
Change the blend mode to
luminosity
Lower the opacity of them
to 50%
Now add which elements
you'd like
I used the following from
the bottom layer up with a drop shadow unless stated:
PearlsSparkle
SparkleTrail (no drop
shadow)
Branch
Branch
Grass (no drop shadow)
Feather (no drop shadow)
Feather (no drop shadow)
PearlsSparkle (just one
pearl)
PearlsSparkle (just one
pearl)
PearlsSparkle (just one
pearl)
Rainbow
DandilionSeeds
Grass2
Flowers
Flower2
Flower2
Flower
Add some wordart (there
are some in the kit, I just used the same wording and made it my own
a bit :) )
Add your name
Crop your tag to get rid
of the access space that's not needed
Resize if you'd like to
****Most Important****
Add your copy right
information
If you're happy with your
result save to your liking and you're done!
Now to animate if you'd
like to!
Duplicate the FlowerBrush2
layer 3 times
So there are a total of 4
layers
On the first layer
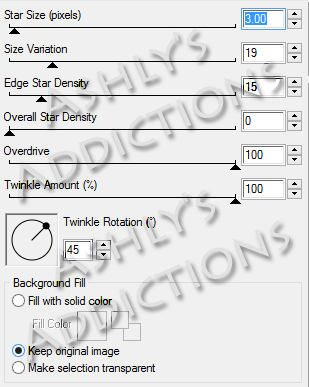
Filter → Xenofex 2 →
Constellation
With the following
settings:
Repeat these for the other
three layers
Hitting random seed once
for each
Go to your animation
window
Hide all but the first
FlowerBrush2 layer
Set to repeat forever
Delay of .15 seconds
Add a new layer
Hide the first layer
Unhide the second
Add a new layer
Hide the second
Unhide the third
Add a new layer
Hide the third
Unhide the fourth
Press play, watch it go!
If you're happy with your
results save as a .gif and you're done!
Here is an example of it non-animated
Click to bring it to full size

Tuesday, July 30, 2013

~~Click on Sample to view
full size~~
This Tutorial was written on July 30th 2013 by Ashly
It is of my own creation and any resemblance to any other tutorial is purely coincidental.
Please do not copy and do not post elsewhere.
This Tutorial was written on July 30th 2013 by Ashly
It is of my own creation and any resemblance to any other tutorial is purely coincidental.
Please do not copy and do not post elsewhere.
Do not translate or
script.
This tutorial is written as if you have a general knowledge on how to use the program.
This tutorial is written as if you have a general knowledge on how to use the program.
***What you'll need***
Program of Choice.
I am using Photoshop CS5
But, if you know your
tools you can use any program of choice
Tube of choice.
I am using the artwork of Jennifer Janesko
You must purchase a
license to use her tubes and can do so HERE
I used a paper from the
kit I'm using to color the blanket or dress that's covering her to
match the kit
This is purely optional if
you'd like to or not. You'd have to use a black and white image to
do so as per TOUs
Scrapkit of Choice
I am using the scrapkit
“Teal Dream” by ChiChi Designz
You can find this HERE
Mask of Choice
I am using Mask219 by
Weescotslass Creations
You can find this for
download HERE
Additional Filters
PhotoEffex – Scanlines
Eye Candy 4000 – HSB
Noise
~*~*~ Let's Get
Started~*~*~
Start a new canvas
600px by 600px
Flood fill with white.
Open frame3
Add to your canvas
Resize down by 65%
Add a drop shadow
Open Paper4
Resize to 600px by 600px
Add to your canvas
Use your magic wand to
select inside the frame
Select → Modify →
Expand, by 6
Invert the selection
On the paper layer press
delete
Duplicate the paper layer
Filter → PhotoEffex →
Scanlines
All at default, except the
width, change to 3
Change the blend mode to
soft light
Open PetalBrush
Add it in between the two
paper layers a couple of times
Erase any that's outside
of the frames
Open Paper3
Resize to 600px by 600px
Add to your canvas just
above the white background layer
Apply the layer mask here
Add your tube to your
canvas, resize and reposition to your liking
Erase any of the tube
that's outside the bottom of the frame
Have this just below the
frame
Duplicate
Move this layer to just
above the frame
Erase any of the tube
that's over the frame
Duplicate
Filter → Blur →
Gaussian Blur, 3.0px
Change the blend mode to
soft light
To the bottom tube add a
drop shadow
Now add which elements
you'd like
I used the following from
the bottom layer up with a drop shadow unless stated:
BubbleBrush (no drop
shadow)
BubbleBrush (no drop
shadow)
Net (no drop shadow)
Glittersplat (no drop
shadow)
Glittersplat (no drop
shadow)
Glittersplat (no drop
shadow)
Branch
Branch
Flowercluster
Flowercluster
Ribbon1
Diamond (add this 2 more
times for a total of three, merge them together and add a drop shadow
to the merged layer)
Dangles
Fan
Flowers1
Flower1
Flower2
Ribbon2
Flowers2
Flower4
Flower3
Butterflies
Butterflies
Butterflies
Butterfly
Sparkles2
Sparkles2
Add your name
Crop your tag to get rid
of the access space that's not needed
Resize if you'd like to
****Most Important****
Add your copy right
information
If you're happy with your
result save to your liking and you're done!
Now if you want to animate
let's continue!
Go to your diamonds and
dangles layers
Duplicate each of them 3
times so you have a total of 4 of each layer
On the first layer of each
Filter → Eye Candy 4000
→ HSB Noise
With the following
settings:

You can use the same one
on each of the two layers so you don't have to change the random seed
for both
Repeat this though and
when you're on the second layer of each hit random seed once
And on the third hit it
once
and on the fourth hit it
once
Then in the animation
window have it set to go forever with a delay of .3 seconds
On the first layer hide
all of the layers except for the bottom of each
Add a new layer and hide
the first layer and unhide the second
Do this for the other
layers
Press play and watch it go
If you're happy with it
save as a .gif and you're done!
Here is a non animated version of the tag
Once again click to view full size

Here is a non animated version of the tag
Once again click to view full size

Friday, May 31, 2013

~~Click on Sample to view
full size~~
This Tutorial was written on May 30th 2013 by Ashly
It is of my own creation and any resemblance to any other tutorial is purely coincidental.
Please do not copy and do not post elsewhere.
This Tutorial was written on May 30th 2013 by Ashly
It is of my own creation and any resemblance to any other tutorial is purely coincidental.
Please do not copy and do not post elsewhere.
Do not translate or
script.
This tutorial is written as if you have a general knowledge on how to use the program.
This tutorial is written as if you have a general knowledge on how to use the program.
***What you'll need***
Program of Choice.
I am using Photoshop CS5
But, if you know your
tools you can use any program of choice
Tube of choice.
I am using the artwork of Keith Garvey
You must purchase a
license to use her tubes and can do so HERE
Scrapkit of Choice
I am using a scrapkit by
ChiChi Designs it's the kit that matches “SoniaRoji 4-2”
You can find this HERE
Mask of Choice
I am using BigMask001 by
Vix
You can find this for
download HERE
Additional Filters Needed
Penta - Jeans
~*~*~ Let's Get
Started~*~*~
Start a new canvas
600px by 600px
Flood fill with white.
Open Frame1
Add to your canvas
Resize by 70%
Rotate by 8 degrees
Add a drop shadow
Open paper3
Resize to 600px by 600px
Add to your canvas
Use your magic wand to
select inside the frame
Select → Modify →
Expand, by 6
Invert the selection
On the paper layer press
delete
Duplicate this layer
Filer → Penta → Jeans
All at deafult
Change the blend mode to
soft light
Open paper5
Resize to 600px by 600px
Add to your canvas just
above the white background layer
Apply the layer mask here
Add your tube to your
canvas, resize and reposition to your liking
Duplicate
Filter → Blur →
Gaussian Blur, 3.0px
Change the blend mode to
soft light
To the botttom tube add a
drop shadow
Add the close up in
between the two paper layers
Erase any that's outside
the frame
Change the blend mode to
luminosity
Lower the opacity to 50%
Now add which elements
you'd like
I used the following from
the bottom layer up with a drop shadow unless stated:
Tree
Vines
Scattered (no drop shadow)
FireFlies (no drop shadow,
add an outer glow)
Grass
Flowers
Flower
Butterflies (just one)
Butterflies (a different
one)
Sparkles (no drop shadow)
Add your name
Crop your tag to get rid
of the access space that's not needed
Resize if you'd like to
****Most Important****
Add your copy right
information
If you're happy with your
result save to your liking and you're done!
Thursday, May 9, 2013

~~Click on Sample to view
full size~~
This Tutorial was written on May 9th 2013 by Ashly
It is of my own creation and any resemblance to any other tutorial is purely coincidental.
Please do not copy and do not post elsewhere.
This Tutorial was written on May 9th 2013 by Ashly
It is of my own creation and any resemblance to any other tutorial is purely coincidental.
Please do not copy and do not post elsewhere.
Do not translate or
script.
This tutorial is written as if you have a general knowledge on how to use the program.
This tutorial is written as if you have a general knowledge on how to use the program.
***What you'll need***
Program of Choice.
I am using Photoshop CS5
But, if you know your
tools you can use any program of choice
Tube of choice.
I am using the artwork of Zlata_M
You must purchase a
license to use her tubes and can do so HERE
This particular tube was a
quest item. Look at the quests on the PFD site to see how you could
get it as well :)
Scrapkit of Choice
I am using the “Magnolia”
Mini by ChiChi's Designz
You can find this HERE
Mask of Choice
I am using Mask5 by
Melissa's Creationz
You can find this for
download HERE
Additional Filters Needed
PhotoEffex - Scanlines
~*~*~ Let's Get
Started~*~*~
Start a new canvas
600px by 600px
Flood fill with white.
Open Frame1
Add to your canvas
Resize by 60%
Duplicate Twice
On the middle one
desaturate
Rotate the bottom two a
bit
Each going opposite
directions
Merge all three together
Add a drop shadow
Open Paper5
Resize to 600px by 600px
Add to your canvas
just below the frame
Use your magic wand to
select inside the frame
Select → Modify →
Expand, by 5
Invert the selection
On the paper layer press
delete
Duplicate this layer
Filter → PhotoEffex →
Scanlines
All at default, except the
width, change to 3
Change the blend mode to
soft light
Open Paper2
Resize to 600px by 600px
Add to your canvas just
above the white background layer
Apply the layer mask here
Add your tube to your
canvas, resize and reposition to your liking
Duplicate this layer
Filter → Blur →
Gaussian Blur, 3.0px
Change the blend mode to
screen
To the bottom tube add a
drop shadow
Add your tube once more
between the two frame background paper layers
Erase any of the tube
that's outside the frame
Change the blend mode to
Luminosity
Lower the opacity to 80%
Now add which elements
you'd like
I used the following from
the bottom layer up with a drop shadow unless stated:
LaceBrush (no drop shadow)
Leaves
Vine
Branch
Ribbon
1
Teapot
4
4
4
Swan
3
Butterfly
Butterfly
Sparkles (no drop shadow,
erase what's over the tube, duplicate twice)
Add your name
Crop your tag to get rid
of the access space that's not needed
Resize if you'd like to
****Most Important****
Add your copy right
information
If you're happy with your
result save to your liking and you're done!
Monday, May 6, 2013

~~Click on Sample to view
full size~~
This Tutorial was written on May 5th 2013 by Ashly
It is of my own creation and any resemblance to any other tutorial is purely coincidental.
Please do not copy and do not post elsewhere.
This Tutorial was written on May 5th 2013 by Ashly
It is of my own creation and any resemblance to any other tutorial is purely coincidental.
Please do not copy and do not post elsewhere.
Do not translate or
script.
This tutorial is written as if you have a general knowledge on how to use the program.
This tutorial is written as if you have a general knowledge on how to use the program.
***What you'll need***
Program of Choice.
I am using Photoshop CS5
But, if you know your
tools you can use any program of choice
Tube of choice.
I am using the artwork of Ellie Milk
You must purchase a
license to use her tubes and can do so HERE
Scrapkit of Choice
I am using “Spring Tide”
by ChiChi's Designz
You can find this HERE
Mask of Choice
I am using Mask 113 by
Designs by Vabys
You can find this for
download HERE
Additional Filters Needed
VanDerLee – Unplugged-X
– TV RBG
~*~*~ Let's Get
Started~*~*~
Start a new canvas
600px by 600px
Flood fill with white.
Open LeavesFrame
Add to your canvas
Resize by 90%
Add a drop shadow
Open Paper13
Resize to 600px by 600px
Add to your canvas
just below the frame
Use your magic wand to
select inside the frame
Select → Modify →
Expand, by 5
Invert the selection
On the paper layer press
delete
Open Paper6
Resize to 600px by 600px
Add to your canvas just
above the white background layer
Apply the layer mask here
Add your tube to your
canvas, resize and reposition to your liking
Erase any of the legs that
are over the frame
Duplicate this layer
Filter → Blur →
Gaussian Blur, 3.0px
Change the blend mode to
soft light
To the bottom tube add a
drop shadow
Duplicate the Paper frame
background
Filter → VanDerLee →
Unplugged-X → TV RGB
Change the blend mode to
soft light
Above this layer add the
Light element
No drop shadow
Erase any of the light
rays that are outside the frame
Now add which elements
you'd like
I used the following from
the bottom layer up with a drop shadow unless stated:
Path
Dupliate and flip this one
horizontally and move it to the right just a bit.
~Start on the left side
and only work there for now~
Ribbon
WateringCan
Flowers3
Flowers5
Flower5
Teapot
PinkDrink
CupCake
Flower7
Bow2
Bow2
Sparkles (no drop shadow)
Duplicate all of these
layers
Flip horizontally and move
to the right a bit
Move down below the tubes
layers in the layers pallate
Move the bow layers a bit
Add Wordart3
Add a stroke as well as a
drop shadow
Add your name
Crop your tag to get rid
of the access space that's not needed
Resize if you'd like to
****Most Important****
Add your copy right
information
If you're happy with your
result save to your liking and you're done!
Subscribe to:
Posts
(Atom)
I CT For
