Snag My Blinkie

Find me on FB
Blogs I Love


Proud Member


Blog Awards


Wednesday, July 31, 2013

~~Click on Sample to view
full size~~
This Tutorial was written on July 31st 2013 by Ashly
It is of my own creation and any resemblance to any other tutorial is purely coincidental.
Please do not copy and do not post elsewhere.
This Tutorial was written on July 31st 2013 by Ashly
It is of my own creation and any resemblance to any other tutorial is purely coincidental.
Please do not copy and do not post elsewhere.
Do not translate or
script.
This tutorial is written as if you have a general knowledge on how to use the program.
This tutorial is written as if you have a general knowledge on how to use the program.
***What you'll need***
Program of Choice.
I am using Photoshop CS5
But, if you know your
tools you can use any program of choice
Tube of choice.
I am using the artwork of PinUp Toons
You must purchase a
license to use his tubes and can do so HERE
This was a bonus tube but,
there are plenty of others that would work so well with this
Scrapkit of Choice
I am using Inpired by kit
by Chichi Designs
You can find this kit HERE
It was inspired by the
tube I'm using in this tutorial
Mask of Choice
I am using Mask219 by
Weescotslass Creations
You can find this for
download HERE
Additional Filters
PhotoEffex - Scanlines
Xenofex 2 - Constellation
~*~*~ Let's Get
Started~*~*~
Start a new canvas
600px by 600px
Flood fill with white.
Open frame1
Add to your canvas
Resize down by 80%
Add a drop shadow
Open frame3
Add to your canvas
Resize down by 80%
Add a drop shadow
Open Paper3
Resize to 600px by 600px
Add to your canvas
Use your magic wand to
select inside the circle frame
Select → Modify →
Expand, by 5
Invert the selection
On the paper layer press
delete
Duplicate this layer
Filter → PhotoEffex →
Scanlines
Width set to 3
change the blend mode to
soft light
Open FlowerBrush2
Add to your canvas below
the frame
Resize a bit
Erase any that's outside
the frame
Open Paper2
Resize to 600px by 600px
Add to your canvas just
above the white background layer
Apply the layer mask here
Open your tube
Add your tube to your
canvas, resize and reposition to your liking
Duplicate
Filter → Blur →
Gaussian Blur
Change the blend mode to
screen
lower the opacity to 50%
To the bottom tube add a
drop shadow
Add your tube in between
the two paper layers
Resize and position as
you'd like
I flipped mine
horizontally
Erase any that's outside
the frame
Change the blend mode to
luminosity
Lower the opacity of them
to 50%
Now add which elements
you'd like
I used the following from
the bottom layer up with a drop shadow unless stated:
PearlsSparkle
SparkleTrail (no drop
shadow)
Branch
Branch
Grass (no drop shadow)
Feather (no drop shadow)
Feather (no drop shadow)
PearlsSparkle (just one
pearl)
PearlsSparkle (just one
pearl)
PearlsSparkle (just one
pearl)
Rainbow
DandilionSeeds
Grass2
Flowers
Flower2
Flower2
Flower
Add some wordart (there
are some in the kit, I just used the same wording and made it my own
a bit :) )
Add your name
Crop your tag to get rid
of the access space that's not needed
Resize if you'd like to
****Most Important****
Add your copy right
information
If you're happy with your
result save to your liking and you're done!
Now to animate if you'd
like to!
Duplicate the FlowerBrush2
layer 3 times
So there are a total of 4
layers
On the first layer
Filter → Xenofex 2 →
Constellation
With the following
settings:
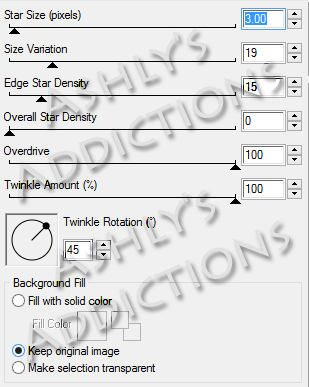
Repeat these for the other
three layers
Hitting random seed once
for each
Go to your animation
window
Hide all but the first
FlowerBrush2 layer
Set to repeat forever
Delay of .15 seconds
Add a new layer
Hide the first layer
Unhide the second
Add a new layer
Hide the second
Unhide the third
Add a new layer
Hide the third
Unhide the fourth
Press play, watch it go!
If you're happy with your
results save as a .gif and you're done!
Here is an example of it non-animated
Click to bring it to full size


~~Click on Sample to view
full size~~
This Tutorial was written on July 31st 2013 by Ashly
It is of my own creation and any resemblance to any other tutorial is purely coincidental.
Please do not copy and do not post elsewhere.
This Tutorial was written on July 31st 2013 by Ashly
It is of my own creation and any resemblance to any other tutorial is purely coincidental.
Please do not copy and do not post elsewhere.
Do not translate or
script.
This tutorial is written as if you have a general knowledge on how to use the program.
This tutorial is written as if you have a general knowledge on how to use the program.
***What you'll need***
Program of Choice.
I am using Photoshop CS5
But, if you know your
tools you can use any program of choice
Tube of choice.
I am using the artwork of Keith Garvey
You must purchase a
license to use his tubes and can do so HERE
Scrapkit of Choice
I am using “Orange
Crush” by Designs by Sarah
You can find this kit HERE
It was inspired by the
tube I'm using in this tutorial
Mask of Choice
I am using Mask141 by
Weescotslass Creations
You can find this for
download HERE
Additional Filters
VanDerLee - Unplugged-X
~*~*~ Let's Get
Started~*~*~
Start a new canvas
600px by 600px
Flood fill with white.
Open frame 2
Add to your canvas
Resize down by 70%
Add a drop shadow
Open pp2
Resize to 600px by 600px
Add to your canvas
Use your magic wand to
select inside the frame
Select → Modify →
Expand, by 5
Invert the selection
On the paper layer press
delete
Duplicate this layer
Filter → VanDerLee →
Unplugged-X
Pattern offset
change the blend mode to
soft light
Open pp-3
Resize to 600px by 600px
Add to your canvas just
above the white background layer
Apply the layer mask here
Open your tube
Add your tube to your
canvas, resize and reposition to your liking
Move below the frame
Erase any of the tube
that's outside the circle frame at the bottom
Duplicate
Move this layer above the
circle frame
Erase any of the tube
that's over the frame
Filter → Sharpen →
Smart Sharpen
Amount – 500%, Radius -
.2px, Remove Gaussian Blur
Filter → Blur → Smart
Blur
Radius – 3.7px,
Threshold, .2
Duplicate
Filter → Sharpen →
Sharpen
Change the blend mode to
soft light
lower the opacity to 50%
To the bottom tube add a
drop shadow
Add your tube in between
the two paper layers a couple of times
Resize and position as
you'd like
Erase any that's outside
the frame
Change the blend mode to
luminosity
Lower the opacity of them
to 50%
Now add which elements
you'd like
I used the following from
the bottom layer up with a drop shadow unless stated:
print (no drop shadow)
print (no drop shadow)
arrow1
arrow1
ribbon frame
ribbon 4
ribbon 3
ribbon 2
ribbon 1
bow 1
button
button
button
button
arrow 2
cupcake
ipod
camera
milkshake
heart
Add your name
Crop your tag to get rid
of the access space that's not needed
Resize if you'd like to
****Most Important****
Add your copy right
information
If you're happy with your
result save to your liking and you're done!
Now to animate if you'd
like to!
Duplicate the camera layer
Filter → Render → Lens
Flare
Brightness – 100%
50-300mm zoom
Move the + to where the
flash would occur
Now go to your animation
window
Have two layers in it
Set to go forever
In the first one have the
delay set to 2 seconds
and have the normal camera
visible
In the second one have the
delay at 0.2 seconds
With the camera with the
flash visible
Press play and watch it
go!
If you're happy save as a
.gif and you're done!
Here is a sample of it non-animated
Click on image to see full size


~~Click on Sample to view
full size~~
This Tutorial was written on July 31st 2013 by Ashly
It is of my own creation and any resemblance to any other tutorial is purely coincidental.
Please do not copy and do not post elsewhere.
This Tutorial was written on July 31st 2013 by Ashly
It is of my own creation and any resemblance to any other tutorial is purely coincidental.
Please do not copy and do not post elsewhere.
Do not translate or
script.
This tutorial is written as if you have a general knowledge on how to use the program.
This tutorial is written as if you have a general knowledge on how to use the program.
***What you'll need***
Program of Choice.
I am using Photoshop CS5
But, if you know your
tools you can use any program of choice
Tube of choice.
I am using the artwork of FourXsDesigns
You must purchase a
license to use her tubes and can do so HERE
Scrapkit of Choice
I am using “My Immortal
II” by Pimp'd Designz
You can find this kit HERE
Mask of Choice
I am using Mask219 by
Weescotslass Creations
You can find this for
download HERE
~*~*~ Let's Get
Started~*~*~
Start a new canvas
600px by 600px
Flood fill with white.
Open frame-05
Add to your canvas
Resize down by 80%
Add a drop shadow
Open pp-06
Resize to 600px by 600px
Add to your canvas
Use your magic wand to
select inside the frame
Select → Modify →
Expand, by 5
Invert the selection
On the paper layer press
delete
Open frame-02
Add to your canvas
Rotate -70 degrees
Resize down by 57%
Add a drop shadow
Use your brush tool and
close off both ends of the frame
Open pp-01
Resize to 600px by 600px
Add to your canvas
Use your magic wand to
select inside the frames
Select → Modify →
Expand, by 2
Invert the selection
On the paper layer press
delete
Open pp-07
Resize to 600px by 600px
Add to your canvas just
above the white background layer
Apply the layer mask here
Open your tube
Add your tube to your
canvas, resize and reposition to your liking
Move below the circle
frame
Erase any of the tube
that's outside the circle frame at the bottom
Duplicate
Move this layer above the
circle frame
Erase any of the tube
that's over the frame
Duplicate
Filter → Blur →
Gaussian Blur, 3.0px
Change the blend mode to
soft light
lower the opacity to 50%
To the bottom tube add a
drop shadow
Add your tube below the
film strip frame
Resize and position as
you'd like
Erase any that's outside
the frame
Change the blend mode to
luminosity
Lower the opacity of them
to 50%
Now add which elements
you'd like
I used the following from
the bottom layer up with a drop shadow unless stated:
Mask (no drop shadow)
Mask (no drop shadow)
blood-03 (no drop shadow)
blood-03 (no drop shadow)
Moon (no drop shadow, add
an outer glow)
ribbon-04
splatter-03
flower-04
flower-04
sparkle-02 (no drop
shadow)
clock-01
star-02
splatter-01 (no drop
shadow)
heart-01
charm-01
book-02
greens-01
flower-01
star-01
flower-02
heart-02
ribbon-03
ribbon-03
key
sparkle-01 (no drop
shadow)
sparkle-01 (no drop
shadow)
Add your name
Crop your tag to get rid
of the access space that's not needed
Resize if you'd like to
****Most Important****
Add your copy right
information
If you're happy with your
result save to your liking and you're done!


~~Click on Sample to view
full size~~
This Tutorial was written on July 31st 2013 by Ashly
It is of my own creation and any resemblance to any other tutorial is purely coincidental.
Please do not copy and do not post elsewhere.
This Tutorial was written on July 31st 2013 by Ashly
It is of my own creation and any resemblance to any other tutorial is purely coincidental.
Please do not copy and do not post elsewhere.
Do not translate or
script.
This tutorial is written as if you have a general knowledge on how to use the program.
This tutorial is written as if you have a general knowledge on how to use the program.
***What you'll need***
Program of Choice.
I am using Photoshop CS5
But, if you know your
tools you can use any program of choice
Tube of choice.
I am using the artwork of FourXsDesigns
You must purchase a
license to use her tubes and can do so HERE
This has 12 layers
6 close ups, 6 full body
2 Latin, 2 American and 2
Jamaican
Template of Choice
I am using Template054 by
Spawn
Which you can find HERE
Additional Filters
PhotoEffex – Scanlines
MuRa's Meister – Copies
Funhouse – Xaggerate
VanDerLee – Unplugged-X
Xenofex 2 - Constellation
~*~*~ Let's Get
Started~*~*~
Open the template in your
program
Delete the credits layer
Filter → MuRa's Meister
→ Copies
Wallpaper (rotate)
All at default
Duplicate this layer
On the bottom one
Filter → Blur → Motion
Blur
Angle – 15 deg
Distance – 80px
Filter → Sharpen →
Sharpen Edges
Filter → Sharpen →
Sharpen Edges
Filter → Sharpen →
Sharpen More
Filter → Sharpen →
Sharpen More
On the top one
Filter → Funhouse →
Xaggerate
Both at default (24)
Change the blend mode to
Darker Color
Lower the Opacity to 70%
Add a new layer above
“Grey Wavey”
Select the Wave
Make a gradient similar to
mine:

On the new layer drag out
the gradient
(I went from the top left
of the wave to the bottom right corner of it)
Add a new layer below this
new red white and blue wave
Select → Modify →
Expand, by 3
Add the gradient to this
new layer again, only drag it out in reverse
Filter → Noise → Add
Noise
Gaussian, 12.5%,
Monochromatic
Using the magic wand tool
go to your tube
On the close up select the
right bikini cup with the stars
Copy it
And then paste it into
your canvas
Filter → MuRa's Meitser
→ Copies
Wallpaper (rotate)
All at default
Repeat
Change the blend mode to
soft light
Duplicate this layer
Filter → PhotoEffex →
Scanlines
Change the width to 3
Leave the blend mode at
soft light
Select the Black Wavey
Go to the original layer
with MuRa's Meister'd
Copy and Paste
Duplicate
Filter → VanDerLee →
Unplugged-X
Pattern Offset
Change the blend mode to
soft light
On the bottom one add an
outer Glow
Add your full body tube in
between these two layers
Filter → MuRa's
Meister's → Copies
Line
Change the number to 7
Erase any of the tubes
that are outside the wave
Change the blend mode to
luminosity
Lower the opacity to 50%
Add some wordart if you'd
like
I did American Pride -
Add your tube
Resize and Reposition as
you'd like
Duplicate
Filter → Blur →
Gaussian Blur, 3.0 px
Change the blend mode to
soft light
Lower the opacity to 50%
Add a drop shadow to the
bottom tube
Select the whole canvas
Add a new layer
Edit → Stroke
10 px, center, black
Add another layer
Edit → Stroke
7px, center, any color is
fine
Select just it and fill
with the gradient we used before
Add noise as we did before
as well
Add your name
*****Most Important*****
Add your copyright
information
Delete the Dots, Grey
Wavey, Black Wavey & Main Background
If you don't want to
animate save to your liking and you're done!
Duplicate the bottom layer
4 times
There's a total of 5 now
Hide the bottom one
Just saving in just in
case I make a mistake :)
On the first one
Filter → Xenofex 2 →
Constellation
With the following
Settings:

Add it to the other 3
layers
Hitting random seed on
each one
Lower the opacity of the
layer just about these from 70% to 50%
Have the delay set to .15
and set to go forever
Have for layers in the
animation window
only having one visible
for each frame
Press play to watch it go
If you're happy with the
result save as a .gif and you're done.
If you'd like to make an
avi
I did it by merging my
layers together and dragging them over and resizing to how I'd like
then readded the borders,
names, copyright information
The animation is the same
that I used before, only just on the black overlay border instead :)

~~Click on Sample to view
full size~~
This Tutorial was written on July 30th 2013 by Ashly
It is of my own creation and any resemblance to any other tutorial is purely coincidental.
Please do not copy and do not post elsewhere.
This Tutorial was written on July 30th 2013 by Ashly
It is of my own creation and any resemblance to any other tutorial is purely coincidental.
Please do not copy and do not post elsewhere.
Do not translate or
script.
This tutorial is written as if you have a general knowledge on how to use the program.
This tutorial is written as if you have a general knowledge on how to use the program.
***What you'll need***
Program of Choice.
I am using Photoshop CS5
But, if you know your
tools you can use any program of choice
Tube of choice.
I am using the artwork of Ismael Rac
You must purchase a
license to use his tubes and can do so HERE
Scrapkit of Choice
I am using the scrapkit
“Rock Me” by Designs by Sarah
You can find this HERE
Mask of Choice
I am using BigMask019 by
Vix
You can find this for
download HERE
Animation of Choice
I am using SimoneAni227
Which you can find HERE
Additional Filters
PhotoEffex - Scanlines
~*~*~ Let's Get
Started~*~*~
Start a new canvas
600px by 600px
Flood fill with white.
Open frame 4
Add to your canvas
Resize down by 80%
Add a drop shadow
Open pp4
Resize to 600px by 600px
Add to your canvas
Use your magic wand to
select inside the frames
Select → Modify →
Expand, by 5
Invert the selection
On the paper layer press
delete
Duplicate
Filter → PhotoEffex →
Scanlines
All at default, width set
to 2
Change the blend mode to
soft light
Open frame 1
Add to your canvas
Rotate 90 degrees
counter-clockwise
Resize down by 70%
Rotate -15 Degrees
Add a drop shadow
Duplicate
Flip Horizontally
Reposition on the canvas
to your liking
Open pp1
Resize to 600px by 600px
Add to your canvas just
above the white background layer
Apply the layer mask here
Open your tube
I did recolor my clothing,
the ipod and the hair streaks to match the kit a bit more
This is optional as well,
there are plenty of colors that'd look good with this kit!
Add your tube to your
canvas, resize and reposition to your liking
Duplicate
Filter → Blur →
Gaussian Blur, 3.0px
Change the blend mode to
soft light
To the bottom tube add a
drop shadow
Add your tube in between
the two pink paper layers
Resize and position as
you'd like
Erase any that's outside
the frame
Change the blend mode to
luminosity
Lower the opacity of them
to 50%
Now add which elements
you'd like
I used the following from
the bottom layer up with a drop shadow unless stated:
star 2 (no drop shadow)
star 2 (no drop shadow)
print 1 (no drop shadow)
ribbon 2
string 2
tribal
ribbon 1
star
disco ball
music note 1
star
bow 3
ipod
flower 3
flower 2
flower 4
rock word art (add an
outer glow)
bow 2
bow 2
Add your name
Crop your tag to get rid
of the access space that's not needed
Resize if you'd like to
****Most Important****
Add your copy right
information
If you're happy with your
result save to your liking and you're done!
Now if you want to
animate!
Open your animation that
you're using
Crop the image so only the
right notes are showing

Select all the frames
Click Ctrl + G
(this just groups the
layers and makes the more easy to move and what not)
Now drag this over to your
main canvas
Have it just below the
ipod layer
Hide all the frames aside
from the first one
Got to your animation
window
Have it set to repeat
forever, the delay set to .1 seconds
Add a new layer and hide
the first animation frame and unhide the second
Add a new layer and hide
the second frame and unhide the third
Do this for all the frames
When you're at the last
one just reverse the process to make it loop
Once you're done, press
play to see it in action
If you're happy with the
results save as a .gif and you're done!
Here is a sample of the non-animated version
Click to view full size

Tuesday, July 30, 2013

~~Click on Sample to view
full size~~
This Tutorial was written on July 30th 2013 by Ashly
It is of my own creation and any resemblance to any other tutorial is purely coincidental.
Please do not copy and do not post elsewhere.
This Tutorial was written on July 30th 2013 by Ashly
It is of my own creation and any resemblance to any other tutorial is purely coincidental.
Please do not copy and do not post elsewhere.
Do not translate or
script.
This tutorial is written as if you have a general knowledge on how to use the program.
This tutorial is written as if you have a general knowledge on how to use the program.
***What you'll need***
Program of Choice.
I am using Photoshop CS5
But, if you know your
tools you can use any program of choice
Tube of choice.
I am using the artwork of Shannon Rene-Justice aka Lollipop Labs
You must purchase a
license to use her tubes and can do so HERE
Scrapkit of Choice
I am using the scrapkit
“Dance Princess” by Alika's Scraps
You can find this HERE
Mask of Choice
I am using Mask141 by
Weescotslass Creations
You can find this for
download HERE
Additional Filters
Penta - Jeans
~*~*~ Let's Get
Started~*~*~
Start a new canvas
600px by 600px
Flood fill with white.
Open as01
Add to your canvas
Resize down by 50%
Rotate -10 degrees
Add a drop shadow
Recolor to the pink
Duplicate
Flip Horizontally
Recolor to yellow
Add a drop shadow
Open Paper07
Resize to 600px by 600px
Add to your canvas
Use your magic wand to
select inside the frames
Select → Modify →
Expand, by 3
Invert the selection
On the paper layer press
delete
Duplicate
Filter → Penta → Jeans
All at default
Change the blend mode to
soft light
Open paper01
Resize to 600px by 600px
Add to your canvas just
above the white background layer
Apply the layer mask here
Add your tube to your
canvas, resize and reposition to your liking
Duplicate
Filter → Blur →
Gaussian Blur, 3.0px
Change the blend mode to
soft light
To the bottom tube add a
drop shadow
Add your tube in between
the two orange paper layers
Resize and position as
you'd like
I flipped mine
horizontally
Erase any that's outside
the frame
Change the blend mode to
luminosity
Lower the opacity of them
to 30%
Now add which elements
you'd like
I used the following from
the bottom layer up with a drop shadow unless stated:
as06 (no drop shadow)
as17
as32
as28
as10
as09
as18
as20
as12
as31
as13
as03
as05
I added sparkles that I
got from another kit of Alika's here, no drop shadow.
Add your name
Crop your tag to get rid
of the access space that's not needed
Resize if you'd like to
****Most Important****
Add your copy right
information
If you're happy with your
result save to your liking and you're done!

~~Click on Sample to view
full size~~
This Tutorial was written on July 30th 2013 by Ashly
It is of my own creation and any resemblance to any other tutorial is purely coincidental.
Please do not copy and do not post elsewhere.
This Tutorial was written on July 30th 2013 by Ashly
It is of my own creation and any resemblance to any other tutorial is purely coincidental.
Please do not copy and do not post elsewhere.
Do not translate or
script.
This tutorial is written as if you have a general knowledge on how to use the program.
This tutorial is written as if you have a general knowledge on how to use the program.
***What you'll need***
Program of Choice.
I am using Photoshop CS5
But, if you know your
tools you can use any program of choice
Tube of choice.
I am using the artwork of Zindy S. D. Nielsen
You must purchase a
license to use her tubes and can do so HERE
Scrapkit of Choice
I am using the FTU
scrapkit “Shades of Grey” by Candy's Treats
You can find this HERE
Mask of Choice
I am using BigMask001 by
Vix
You can find this for
download HERE
Additional Filters
None :)
~*~*~ Let's Get
Started~*~*~
Start a new canvas
600px by 600px
Flood fill with white.
Open frame2
Add to your canvas
Resize down by 80%
Rotate -9 degrees
Add a drop shadow
Open frame1
Add to your canvas
Resize down by 80%
Rotate 8 degrees
Add a drop shadow
Arrange them on your
canvas as you wish
You can use mine as a
guide :)
Open pp3
Resize to 600px by 600px
Add to your canvas
Use your magic wand to
select inside the frames
Select → Modify →
Expand, by 3
Invert the selection
On the paper layer press
delete
Open pp7
Resize to 600px by 600px
Add to your canvas just
above the white background layer
Apply the layer mask here
Add your tube to your
canvas, resize and reposition to your liking
Duplicate
Filter → Blur →
Gaussian Blur, 3.0px
Change the blend mode to
soft light
To the bottom tube add a
drop shadow
Add your tube to the
frames as you'd like
Erase where you'd like to
as well
Lower the opacity of them
to 50%
Now add which elements
you'd like
I used the following from
the bottom layer up with a drop shadow unless stated:
ele14 (no drop shadow)
ele22 (no drop shadow)
Ribbon4
ele22 (no drop shadow)
SpookyRope2
Ribbon6
ele19
ele19
ele3 (no drop shadow)
ele11
Leaves2
Flower5
SilverStud
SilverStud
Flower4
FlowerSmall
Bow2
Bow1
SilverStud
Add your name
Crop your tag to get rid
of the access space that's not needed
Resize if you'd like to
****Most Important****
Add your copy right
information
If you're happy with your
result save to your liking and you're done!

~~Click on Sample to view
full size~~
This Tutorial was written on July 30th 2013 by Ashly
It is of my own creation and any resemblance to any other tutorial is purely coincidental.
Please do not copy and do not post elsewhere.
This Tutorial was written on July 30th 2013 by Ashly
It is of my own creation and any resemblance to any other tutorial is purely coincidental.
Please do not copy and do not post elsewhere.
Do not translate or
script.
This tutorial is written as if you have a general knowledge on how to use the program.
This tutorial is written as if you have a general knowledge on how to use the program.
***What you'll need***
Program of Choice.
I am using Photoshop CS5
But, if you know your
tools you can use any program of choice
Tube of choice.
I am using the artwork of Jennifer Janesko
You must purchase a
license to use her tubes and can do so HERE
I used a paper from the
kit I'm using to color the blanket or dress that's covering her to
match the kit
This is purely optional if
you'd like to or not. You'd have to use a black and white image to
do so as per TOUs
Scrapkit of Choice
I am using the scrapkit
“Teal Dream” by ChiChi Designz
You can find this HERE
Mask of Choice
I am using Mask219 by
Weescotslass Creations
You can find this for
download HERE
Additional Filters
PhotoEffex – Scanlines
Eye Candy 4000 – HSB
Noise
~*~*~ Let's Get
Started~*~*~
Start a new canvas
600px by 600px
Flood fill with white.
Open frame3
Add to your canvas
Resize down by 65%
Add a drop shadow
Open Paper4
Resize to 600px by 600px
Add to your canvas
Use your magic wand to
select inside the frame
Select → Modify →
Expand, by 6
Invert the selection
On the paper layer press
delete
Duplicate the paper layer
Filter → PhotoEffex →
Scanlines
All at default, except the
width, change to 3
Change the blend mode to
soft light
Open PetalBrush
Add it in between the two
paper layers a couple of times
Erase any that's outside
of the frames
Open Paper3
Resize to 600px by 600px
Add to your canvas just
above the white background layer
Apply the layer mask here
Add your tube to your
canvas, resize and reposition to your liking
Erase any of the tube
that's outside the bottom of the frame
Have this just below the
frame
Duplicate
Move this layer to just
above the frame
Erase any of the tube
that's over the frame
Duplicate
Filter → Blur →
Gaussian Blur, 3.0px
Change the blend mode to
soft light
To the bottom tube add a
drop shadow
Now add which elements
you'd like
I used the following from
the bottom layer up with a drop shadow unless stated:
BubbleBrush (no drop
shadow)
BubbleBrush (no drop
shadow)
Net (no drop shadow)
Glittersplat (no drop
shadow)
Glittersplat (no drop
shadow)
Glittersplat (no drop
shadow)
Branch
Branch
Flowercluster
Flowercluster
Ribbon1
Diamond (add this 2 more
times for a total of three, merge them together and add a drop shadow
to the merged layer)
Dangles
Fan
Flowers1
Flower1
Flower2
Ribbon2
Flowers2
Flower4
Flower3
Butterflies
Butterflies
Butterflies
Butterfly
Sparkles2
Sparkles2
Add your name
Crop your tag to get rid
of the access space that's not needed
Resize if you'd like to
****Most Important****
Add your copy right
information
If you're happy with your
result save to your liking and you're done!
Now if you want to animate
let's continue!
Go to your diamonds and
dangles layers
Duplicate each of them 3
times so you have a total of 4 of each layer
On the first layer of each
Filter → Eye Candy 4000
→ HSB Noise
With the following
settings:

You can use the same one
on each of the two layers so you don't have to change the random seed
for both
Repeat this though and
when you're on the second layer of each hit random seed once
And on the third hit it
once
and on the fourth hit it
once
Then in the animation
window have it set to go forever with a delay of .3 seconds
On the first layer hide
all of the layers except for the bottom of each
Add a new layer and hide
the first layer and unhide the second
Do this for the other
layers
Press play and watch it go
If you're happy with it
save as a .gif and you're done!
Here is a non animated version of the tag
Once again click to view full size

Here is a non animated version of the tag
Once again click to view full size


~~Click on Sample to view
full size~~
This Tutorial was written on July 30th 2013 by Ashly
It is of my own creation and any resemblance to any other tutorial is purely coincidental.
Please do not copy and do not post elsewhere.
This Tutorial was written on July 30th 2013 by Ashly
It is of my own creation and any resemblance to any other tutorial is purely coincidental.
Please do not copy and do not post elsewhere.
Do not translate or
script.
This tutorial is written as if you have a general knowledge on how to use the program.
This tutorial is written as if you have a general knowledge on how to use the program.
***What you'll need***
Program of Choice.
I am using Photoshop CS5
But, if you know your
tools you can use any program of choice
Tube of choice.
I am using the artwork of Anna Liwanag
You must purchase a
license to use her tubes and can do so HERE
Scrapkit of Choice
I am using the scrapkit
“Soft” by Rissa's Designs
You can find this HERE
Mask of Choice
I am using BigMask016 by
Vix
You can find this for
download HERE
Additional Filters
Penta – Color Dot
~*~*~ Let's Get
Started~*~*~
Start a new canvas
600px by 600px
Flood fill with white.
Open frame5
Add to your canvas
Resize down by 80%
Rotate -5 degrees
Duplicate, flip
horizontally
Resize the duplicate by
90%
Arrange on your canvas
Add a drop shadow
Open Paper6
Resize to 600px by 600px
Add to your canvas
Use your magic wand to
select inside the frames
Select → Modify →
Expand, by 6
Invert the selection
On the paper layer press
delete
Open Paper10
Resize to 600px by 600px
Add to your canvas just
above the white background layer
Apply the layer mask here
Add your tube to your
canvas, resize and reposition to your liking
Duplicate
Filter → Blur →
Gaussian Blur, 3.0px
Change the blend mode to
soft light
To the bottom tube add a
drop shadow
Add the tube under each of
the frames
Flip one horizontally
Change the blend mode to
luminosity
Lower the opacity to 50%
Duplicate the paper
background layer
Move above the tube in the
frame layers
Filter → Penta → Color
Dot
All at default
Change the blend mode to
soft light
Now add which elements
you'd like
I used the following from
the bottom layer up with a drop shadow unless stated:
Flowers
Flowers
Pearls
Stars (no drop shadow)
Stars (no drop shadow)
String
Lights2
FlowerScatter3
Berries
Berries
Star
Star
Star
Star
FlowerScatter2
HeartDangle
HeartDangle
Pillows
Cup1
Flower4
Key
Cup2
Clock
Flower3
ButterflyScatter (just one
from it)
ButterflyScatter (just one
from it)
ButterflyScatter (just one
from it)
ButterflyScatter (just one
from it)
I added some sparkles here
that I got from elsewhere, this is purely optional :)
Add your name
Crop your tag to get rid
of the access space that's not needed
Resize if you'd like to
****Most Important****
Add your copy right
information
If you're happy with your
result save to your liking and you're done!
Subscribe to:
Posts
(Atom)
I CT For
